Printer Setup for Windows NT/2000/XP
1.
When
setting up any printer make sure to log onto your computer as the Administrator
or a user with Administrator privileges.
You may need to speak with your IT person to log on properly.
2.
Connect
your printer to your computer as directed by the manufacturers instructions.
3.
Install
the print driver that is specific to your printer (if you are using a Lexmark
2300 series printer then use the IBM Proprinter driver). Again refer to the manufacturers instructions
for the installation of your printer.
4.
Rename
the printer to “UPS” by right-clicking on the printer you have installed and
selecting the rename option. If you
have closed the window with the printer names you can always get back to it by
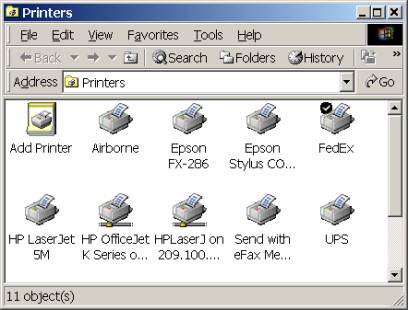
going to the windows Start – Settings – Printer. When you have finished renaming the printer
it should look like the printer in the bottom right-hand corner of Figure 1.
Figure 1: Notice the UPS Printer
in the bottom right-hand corner.
5.
If
you are using the FedEx and/or Airborne forms then you will need to repeat
steps 2 and 3 but instead of renaming to “UPS” you would rename your printer to
“FedEx” and/or “Airborne”.
6.
Open
the Haz-Shipper program and create a test shipment by using UPS, FedEx, or
Airborne. Print the form. If the form prints properly then you are finished
with the printer setup. If not then
continue to step 7.
Note: If the form needs to be
centered on the printer by using the top-of-form feed or left/right adjustments
then refer to your printer manual for these adjustments.
7.
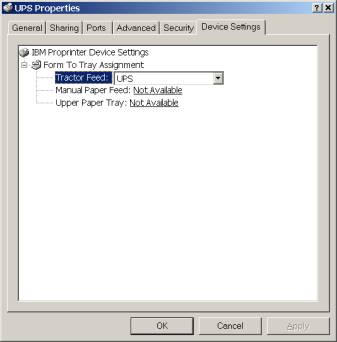
Right-click
on the UPS printer and select properties from the menu. Select the “Device Settings” tab. Select the “Tractor Feed”, and from the
drop-down list, select the UPS form.
Note: Repeat if you are also using
FedEx and/or Airborne modes of transportation.
Figure 2: Note the
Tractor Feed is set to the custom form “UPS” and the Manual Paper Feed and the
Upper Paper Tray are set to “Not Available”.
8.
If
the UPS, FedEx or Airborne forms exist in the “Tractor Feed” drop-down box then
continue to step 9. Otherwise you will
need to create them yourself. To
display the “Print Server Properties” de-select all printers in your “Printers”
dialog box (Figure 1) by clicking on any part of the white space in the dialog
box. Then select File – Server
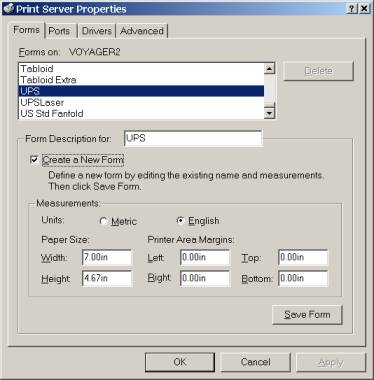
Properties. Click on the “Create a New
Form” and set the dimensions as follows (don’t forget to click on the “Save
Form” button when finished.
UPS = Width=7.00in, Height=4.67in
FEDEX = Width=6.25in, Height=2.85in
AIRBORNE = Width=7.50in, Height=8.51in, Left=0.20in
FEDEXLARGE = Width 700 and Length is 425
FEDEXUSAAIRBILL = Width 850 and Length is 550
Figure 3: Print Server
Properties – Setting up a custom form.
9.
Again
Open the Haz-Shipper program and create a test shipment by using UPS, FedEx, or
Airborne. Print the form. If the form prints properly then you are finished
with the printer setup. If not then
continue to step 10.
10.
Open
Haz-Shipper and log in. From the
maintenance menu select company. On the
company screen select “Preview Form” (bottom center of the screen. Figure 3).
Press the Save button (top right of the form – looks like a floppy
disk).
Figure 4: Company Information
Screen

11.
Create
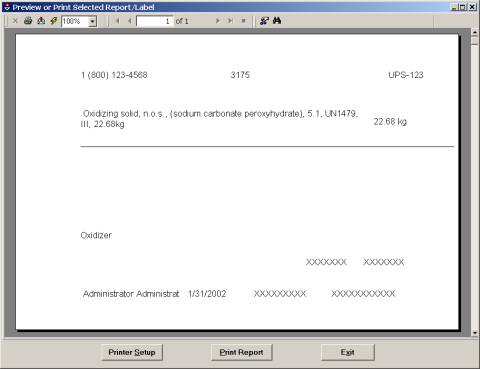
a test shipment by using UPS, FedEx or Airborne modes of transportation. When you press the print button on the
graphical representation of the UPS form a preview form will be displayed. From this form press the Printer Setup
button.
Figure 5: Preview form for
UPS/FedEx or Airborne
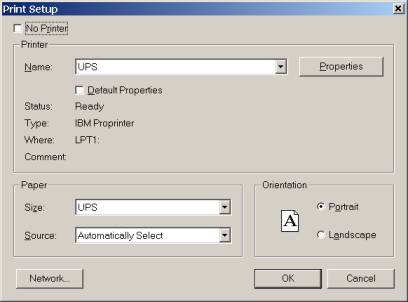
12.
The
printer dialog box will appear. Make
sure UPS has been selected for the printer name and the Paper Size is set to
UPS. If not then reset to look like
Figure 6.
Figure 6: Printer setup box for UPS.
13.
Select
OK from the Printer Setup Box. Then
from the Print Preview Box (Figure 4)
press printer report.